Easy and Efficient Disk Cloning for Windows 10 Users
Disk Cloning Tips for Upgrading to an SSD
Hey folks! I’ve got an old HP Pavilion laptop running Windows 10, and I’m thinking about cloning my entire disk to upgrade to an SSD. Has anyone tackled this before? I could really use some pointers on the best software and steps to follow. I’m a bit of a newbie when it comes to disk cloning, so any advice would be super helpful!

Why People Clone Disks on Windows 10/11 PCs or Laptops
Upgrading from a Smaller Disk to a Bigger One
- Many PCs and laptops come with smaller hard drives, typically around 500GB. This can be frustrating as you quickly run out of space. Swapping out an old hard drive for a larger SSD using reliable disk cloning software is a cost-effective solution compared to buying a new PC.
Swapping an Old HDD for a New SSD
- Adding an SSD can significantly boost your computer’s speed by speeding up data transfers. This upgrade usually makes users much happier with their system’s performance. For gamers, an SSD can be a game-changer, reducing lag and enhancing the experience, especially in fast-paced online FPS games.
AOMEI Backupper: Your Go-To Disk Cloning Tool
Let me share an awesome tool I discovered for system backup and cloning. It’s a game-changer! Not only does it handle cloning, but it also offers backup, synchronization, and other powerful features. Today, we’ll zero in on its cloning abilities.
If you’re on the hunt for top-tier disk cloning software for Windows, look no further than AOMEI Backupper Professional. This disk clone software is incredibly intuitive and has already won over millions of users worldwide.
Why AOMEI Backupper is a Standout:
- Flexible Cloning Options: With AOMEI Backupper, you can easily clone your hard drive to an SSD or another HDD. You can also opt to clone specific partitions or just the operating system, depending on what you need.
- Clone to Any Size Drive: It’s pretty smart, too—it only copies the used sectors, making it a breeze to clone to a smaller drive. If you’re upgrading to a larger one, the “Edit Partitions” feature lets you utilize the entire disk space.
- SSD Optimization: AOMEI Backupper even aligns partitions for SSDs, boosting their speed and longevity.
- Wide Compatibility: It works with all versions of Windows, from 11 back to XP, both 32-bit and 64-bit. Plus, it supports a wide range of drives like HDDs, SSDs, USB drives, and more.
Give AOMEI Backupper a shot and experience the difference for yourself!
Step-by-Step Guide to Cloning Windows 10 SSD
Before you dive into cloning your disk with AOMEI Backupper on Windows 10/11, make sure to follow these essential steps:
- Back Up Important Data: Ensure all critical files on the destination disk are safely backed up to avoid any data loss during cloning.
- Check Disk Space: Verify the space used on your original Windows 10/11 hard drive. If it fits on the target SSD, you’re set. If you’re upgrading to a larger SSD, that’s even better.
- Convert Dynamic Disk to Basic: If your disk is currently dynamic, convert it back to a basic disk before starting the cloning process.
- Prepare Tools: Have your screwdrivers ready—you might need to open up your laptop or desktop.
- Connect the SSD: If your laptop only has one hard drive slot, use a 2.5″ SSD enclosure or a SATA-to-USB cable to connect the new SSD.
Ready to Clone Your Windows 10/11 Hard Drive? Here’s How:
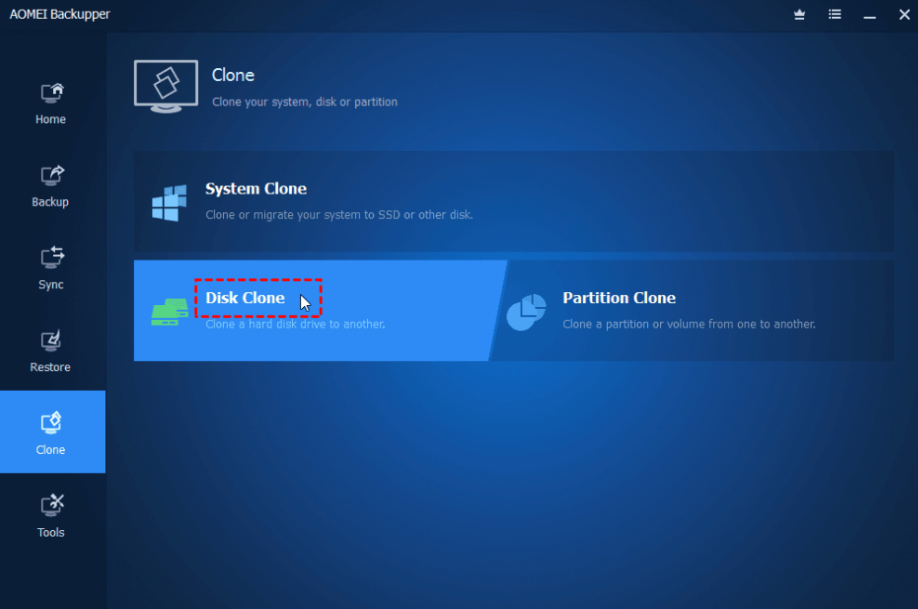
Step 1. Launch AOMEI Backupper: Open the software and navigate to Clone > Disk Clone on the main screen.

- Quick Tip: If you only want to clone your Windows 10/11 system along with all your programs and drivers, select the System Clone option instead.
Step 2. Select Source Disk: Choose your Windows 10/11 hard drive and click the Next >> button to proceed.
Step 3. Select Destination Disk: In the next window, select the larger SSD as your destination and click Next >> to continue.
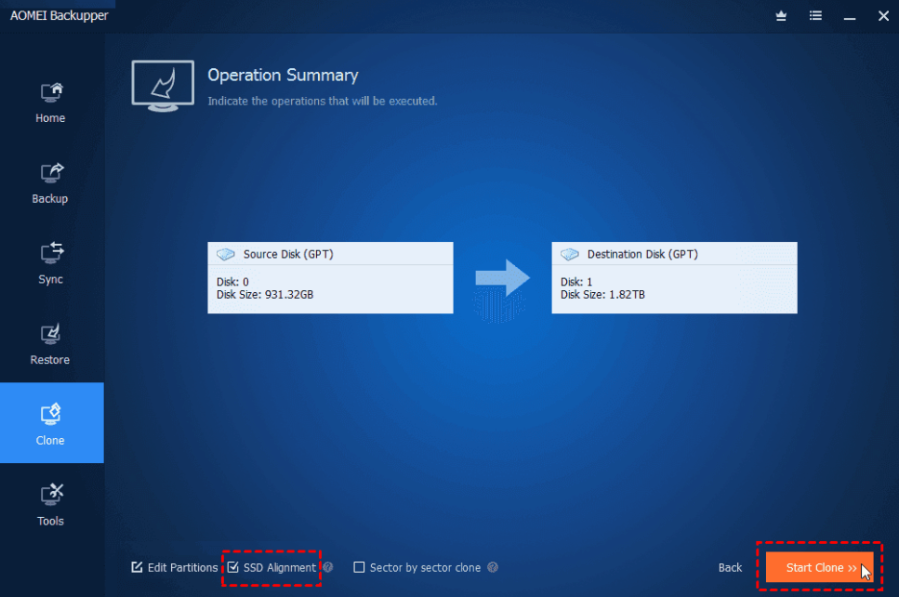
Step 4. Enable SSD Alignment: Tick the SSD Alignment box to optimize the read and write speeds on your new SSD. Then click Start Clone to begin the HDD to SSD cloning process on Windows 10/11.

Step 5. Finish the Cloning Process: Once the cloning reaches 100%, click Finish to wrap up and close the window.
Quick Tips:
- MBR to GPT Cloning: If you’re cloning from MBR to GPT, remember to switch between Legacy and UEFI after the cloning process.
- Sector-by-Sector Clone: This method copies everything from your original hard disk, which makes the process longer. You can’t use the “Edit partitions” option with this method. If you’re upgrading to a larger SSD, use a free partition manager to resize and utilize the full capacity.
- Avoid Sector-by-Sector Cloning for Smaller SSDs: Don’t use this method if you’re moving from a larger HDD to a smaller SSD.
- Edit Partitions: This feature allows you to resize partitions on your new hard drive when upgrading from a smaller Windows 10/11 disk. Uncheck “Add unused space to all partitions” to get some extra room on the larger SSD.
Following these steps will ensure a smooth and efficient cloning process, giving your system the upgrade it deserves!
Your Turn
Cloning a hard drive in Windows 10/11 with AOMEI Backupper is super easy, thanks to its user-friendly interface. With just a few clicks, you can duplicate your entire Windows setup. But that’s just the beginning—it also lets you clone ssd to larger ssd, switch between different-sized disks, clone SATA SSDs, and even migrate Windows to NVMe SSDs.
Besides cloning, AOMEI Backupper offers robust backup options. You can back up individual files, entire partitions, or whole disks, and create system images. These backups are lifesavers when it comes to restoring Windows to a new drive. And if you’re handling server-level tasks, AOMEI Backupper Server has advanced features tailored to your needs.
